In this article, we are going to show you how to create subaccounts in QuickBooks Online using the Chart of Accounts. If you created subaccounts then it will help you in breaking down your expenses, income, and others into more minute details in QuickBooks Online. If you have a parent account (main account) then you will be able to create its subaccounts. Along with this, creating subaccounts will help you in organizing the Chart of Accounts in QuickBooks Online and keep all the information intact. Without delaying anymore, let’s see the detailed procedure of creating the subaccounts in the Chart of Accounts. For More Info. contact us on; +1-844-405-0904
We are going to demonstrate how you can divide your utility accounts into subaccounts and this will help you in keeping track of the various types of utility payments like gas, telephone, water, and many others.
Create a New Sub Account
In order to add a subaccount to the existing account follow the steps mentioned below carefully. If you want to then you can also create a new parent account (main account).
- First of all, click on the setting’s gear icon and then select the Chart of Accounts option.
- Then, click on the New option.
- After that, you’ll be required to select the Account type as well as the Detail type.
- Next, checkmark the box stating the Is sub-account option, and after that select, an appropriate parent account for this subaccount.
- Enter a unique name for the subaccount and if you want then you can also add a description describing the subaccount.
- Then, select When do you want to start tracking your finances from this account in QuickBooks option. NOTE: For accounts like bank accounts, credit card accounts, asset accounts, and liability accounts, you’ll be required to choose this option.
- Save & Close.
Convert an Existing Account into Sub-Account
- Click on the gear icon and then go to Settings> Charts of Account.
- Find the account that you want to convert and then click on the down arrow and select the edit option.
- Checkmark the box stating Is sub-account and then choose a parent account for this.
- Select Save and Close.
Subaccounts in Chart of Accounts and Reports
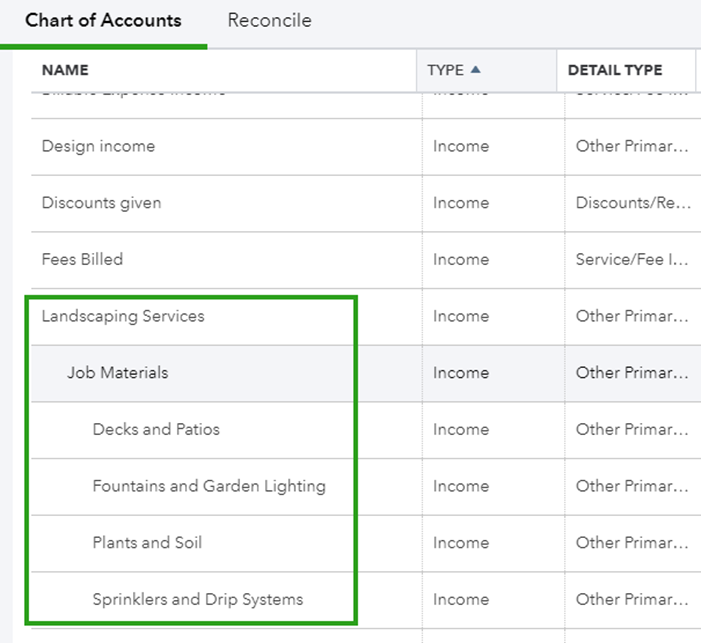
If you are wondering how your Chart of Accounts will be looking after making these changes and adding a subaccount, then below we have illustrated how it is going to looks like.
Chart of Accounts
When you will open the Chart of Accounts in QuickBooks that’s how your subaccounts will appear in it, as shown in the screenshot below.

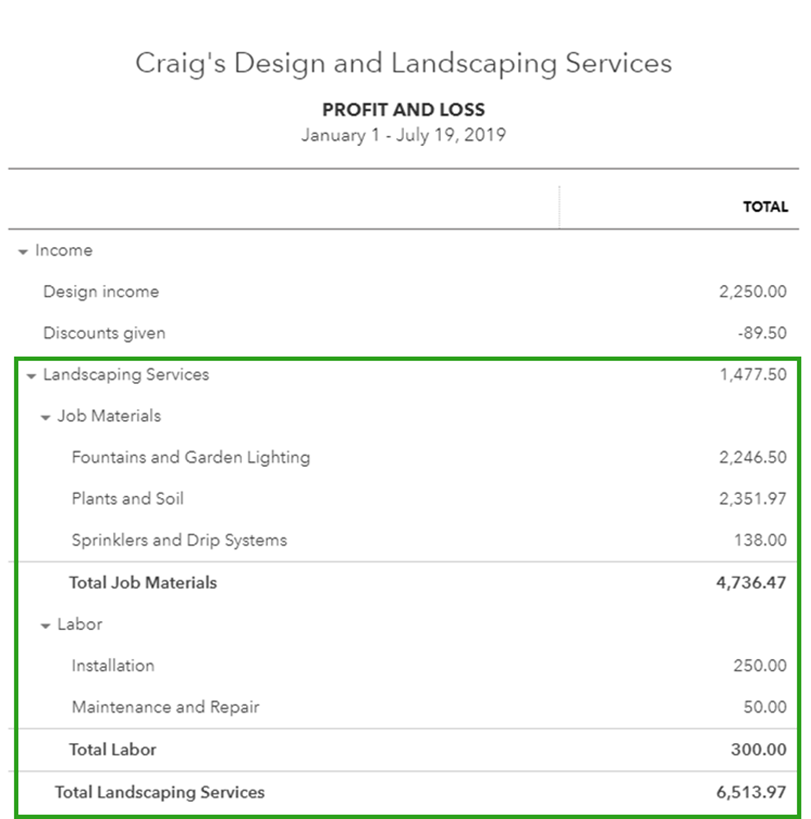
Reports
In order to get a wider perspective and detailed information that includes your income, expenses, and more, you need to run a report for this purpose.
Below, we have provided a screenshot of the profit and loss report. You’ll get a rough idea about the expenses and earnings of the business from this report.

Remove a Subaccount from the Chart of Accounts
There are some accounts that you can’t delete in QuickBooks as these are used as default accounts by QuickBooks, for example, your Sales Tax Account. Other than that, follow the instructions mentioned below to delete a subaccount.
- Click on the gear icon and then go to Settings> Charts of Account.
- Now, look for the account that you are willing to delete.
- Then, click on the Action down arrow and select the Make Inactive option.
NOTE: In the reports, you’ll be still able to see the transactions of the inactive account, this will keep the reports intact and accurate.
The Bottom Line
Now, you know how to create subaccounts in QuickBooks Online in simple steps. In addition to this, we have also demonstrated how to change an existing account to a subaccount or remove them if you no longer use that account. You can also contact the team of Intuit Certified QuickBooks ProAdvisors if you want assistance in creating a subaccount. For an instant solution call us at our 24/7 toll-free number +1-844-405-0904.
