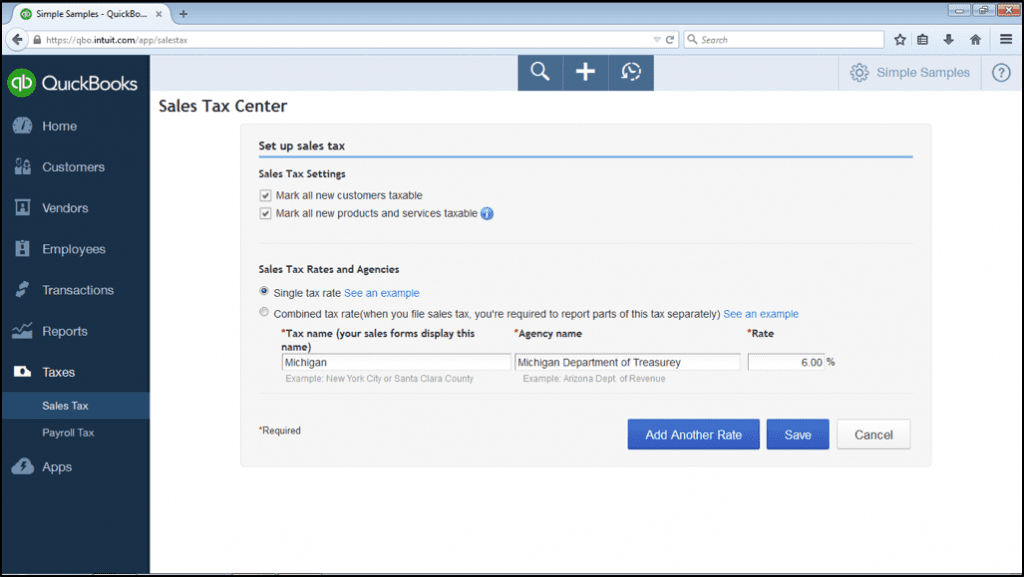
You must change and update the QuickBooks sales tax that you previously created in accordance with legal requirements. The sales tax rate is frequently changed by the financial authorities, and as a QuickBooks user, you must be aware of these changes. As a result, we are here to help you change your custom sales tax rate if you have set one up, as well as set up sales tax in QuickBooks. If you are still having issues, call our QuickBooks ProAdvisor toll-free at: +1-844-405-0904
You can manually change the sales tax rate in QuickBooks. It can be edited on any device or product. Below we have discussed the procedures for changing sales tax rates in QuickBooks Online and QuickBooks Desktop. Let us see how it is done.
Table of Contents
Steps To Change Sales Tax Rate in QuickBooks Online
If you are using QuickBooks Automated Sales Tax then you won’t need to edit the sales tax rates as the auto sales tax feature will automatically set up, update, and track all the taxes for you. But if you manually set up or edit tax rates then you need to follow the below steps to make changes to sales tax rates in QuickBooks Online.
- Open the Taxes menu from the left side navigational tab and then go to the Sales Tax.
- Now from the right side of the screen select the Related Tax option.
- After that, click on the Add/Edit Tax Rates and Agencies.
- Next, Sales Tax Rates and Agencies window will open. Here you need to select the appropriate rate you want to change and then select Edit.

- In the Edit Sales Tax Component Window, you can edit the tax rate as well as the name of the component.
- After making the required changes and reviewing, click on the Save.
- You can view the changes you make in the Sales Tax Rates and Agencies option.
Steps To Change Sales Tax Rate in QuickBooks Online App
If you make transactions using QBO App then you also need to learn how to change the sales tax rates in QuickBooks Online App.
Add a Sales Tax (iPhone and iPad)
- Firstly go to the Menu option and click on Settings.
- Then next you need to select tax rates.
- Click on the Add a new tax rate, and choose whether the rate is combined or single.
- After that, select the new(+) tax and then select single or combined rate.
- Now enter the information about the sales tax rate.
- Single rate: You need to add information about the Tax rate name, Agency, and Rate)
- Combined Rate: You need to add the information Combined tax rate name, Tax rate name, Agency, and rate.
- After doing all the steps mentioned above you have to click on Save.
Change Sales Tax Rate in iPhone/iPad App:
- Go to Menu and then Settings.
- Open the Tax Rate and find the sales tax item you want to edit.
- Click on the Edit option and then make the required changes.
- Save the changes you made.
NOTE: You can edit the tax rates and component names only. But, you can’t change the name of the tax agencies associated with it.
Add Sales Tax Rate (For Android Users)
- The first step you need to go to the settings or gear icon.
- Then next you need to choose Tax rates.
- Next, select + sign to add and then select combined tax rate or single tax rate.
- The next step is to enter the information about the tax rate:
- For single tax rate: Add sale tax name, Agency, and Rate and then select Done.
- For combined tax rate: Add sale tax name, Agency, and Rate, and then click on Done.
Edit/Change Sales Tax Rate in QuickBooks Online Android App:
From this method, you will be able to edit the sales tax rate of the various transactions including estimates, invoices, and sales receipts.
- Firstly, Go to the gear option in QuickBooks online for the web.
- Then next you have to select Sales Taxes.
- Next, you have to select the rate you want to change.
- Then you can edit by clicking on the Edit option.
- After adjustments are made you have to click on Done.
NOTE: To enable this feature in QBO App, you first need to give access to the app using the QB online web.
Steps To Change Custom Sales Tax Rates in QuickBooks Online
Learn to update the custom sales tax rate that you create in QuickBooks Online in a few steps.
- Choose Taxes from the left menu.
- Click on Edit GST and after that select Edit rates from the drop-down menu.
- Choose On or Off with the tax rate which you require to get active or inactive.
- Select Yes to confirm your changes.
Steps To Change Sales Tax Rate in QuickBooks Desktop
In QuickBooks Desktop you can edit the sales tax rate for all the customers at once if the financial institution has introduced a new tax rate. Although, you can change the tax rate every time you make a transaction for your customer. But there is a chance sometimes you may not remember to change the tax rate in transactions. Therefore, it is necessary to learn how to change the sales tax rate in QuickBooks Desktop once and for all.

- From the top menu bar, click on the Lists option.
- Then select Sales Item in the drop-down menu and right-click on the option.
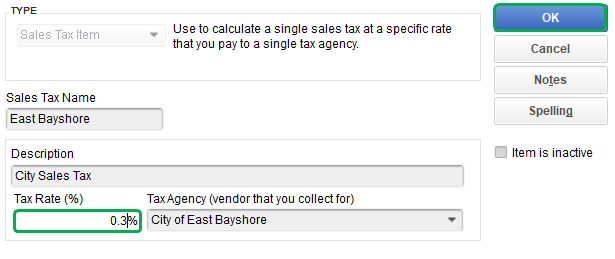
- Now, a new window will open. Here in the Tax Rate (%) field enter the new rate.
- You can also edit Sales Tax Name and add a description. Then hit the OK button.
If you still can’t get how to change the sales tax rate in QuickBooks. Then, you can also deactivate the existing tax and set up a new sales tax rate in QuickBooks for all the new transactions in QuickBooks.
Steps to Edit Tax Agency Name
If you are required to change the sales tax agency’s name then you can do it manually. Although, the old name will still appear on sales forms. If you want to make a different name appear on the sales form then you have to create a new tax agency.
Here we’ll discuss the steps to edit the tax agency’s name.
- The first step you will need to navigate to Taxes.
- Then next tap on Sales tax.
- Next, under the agency name column, you have to choose the tax agency that you want to edit.
- After that select rename.
- Now you can edit the name or rename whatever you want.
- Then the final step click on save.
Note* It may be possible that you’ll face some problems with the update so if this happens then deactivate the present tax rate and then set up a new sales tax.
How to Add a Sales Tax Rate during Transaction
- The very first step is to open an estimate or invoice.
- Then next you have to select the Edit option.
- Now click on Add Item and then select + sign.
- Then select the Taxable checkbox.
- After that, you have to enter tax rate info by choosing Add Tax.
- Now the final step is to click on Done.
Effects of Editing Sales Tax Rate in QuickBooks
Let us now see what will happen after changing the sales tax rate in QuickBooks.

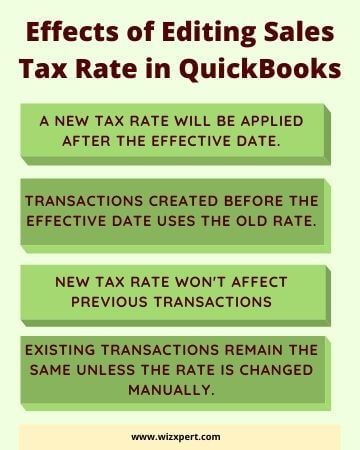
- The new transactions will use the new rate after you changed the sales tax rate. Even if you use the date before you make the changes.
- The previous transactions won’t get affected by the changes you made in the tax rate.
- Although you can edit the earlier transactions if you want to make changes to the sales tax rate.
- And same is for the recurring invoice template, the new transactions will use new tax rates and earlier transactions won’t be get affected.
- For the outstanding transactions that you’ve entered date before changing the tax rate, then you can simply edit these transactions.
Frequently Asked Questions
If the Tax Rate is Changed, the New Tax Rate will be Applied to the Previous Transactions?
No. The new tax rate will automatically be applied to all the transactions entered after the effective date for the new tax rate.
What is the Default Tax Rate in QuickBooks?
Sales tax is also referred to as a default tax rate which is automatically applied to transactions on the basis of your location. For changing the default tax rate, you can create a new tax item.
What is the Effective Date in Sales Tax Rate?
The effective date is the date on which the new tax will be applied. All the transactions after this date will have the new tax rate.
How sales tax items be added?
To add sales tax items follow the steps:
1. From the list menu, select the item list.
2. Then you have to click on the Item menu button.
3. Next, you have to choose the New.
4. Now select the sales tax item from the Type section.
5. Then add the right name of the tax.
6. After that, write the right description in the description field.
7. Enter the sales tax rate in percentage.
8. Then finally add the name of the particular division in the Tax agency section from where the payments are issued.
How sales tax adjustments can be removed?
The first step you need to find the tax period you need to adjust or remove.
1. Now next you have to choose View Return.
2. Then next you have to choose the adjustment amount.
3. Next, you need to click on Delete.
4. Now a confirm dialog box is open select Delete again.
Hope, you have understood the importance of changing the sales tax rate. We have also explained how you can easily change in QuickBooks. Still, have some confusion in mind? Talk to our QuickBooks ProAdvisor team at +1-844-405-0904 to troubleshoot your problem.
