Want to know the procedure to print 1099 in QuickBooks Online and QuickBooks Desktop? It may be a little difficult for a beginner to print both forms in the right way. In this article, you can learn, how to print 1099 in QuickBooks Desktop, Mac, & Online, and some of the frequently asked questions related to 1099s, 1096s, and 1099-MISC forms.
Note: One thing to keep in mind before starting the printing of 1099 forms is the (Internal Revenue Service) IRS only validates the pre-printed 1099-MISC form.
Table of Contents
The process to Print 1099 forms in QuickBooks
Set up an Autonomous contractor.
- Firstly, you have to open QuickBooks Desktop.
- Then navigate to the Edit tab and click on the Preference option.
- Now, you have to choose 1099 for tax.
- After that, navigate to the company preferences.
- Click on the yes tab they asked do you file 1099-MISC forms.
- Click on the OK button to save the settings.
Add a Vendor in QuickBooks
- Open Vendors and choose the Vendor Center.
- Now, you see a dropdown Menu and choose a new Vendor from that.
- Go to Vendor Listing and enter the name in the Vendor name field.
- Then you can enter mandatory information.
- The supplier can also modify more information.
- Last click on the OK button.
Get 1099-MISC in QuickBooks by setting up vendors.
- Choose Vendor Center from the Vendor section.
- Find the supplier’s name and then edit the vendor by right-clicking and selecting Edit Vendor.
- Go to the Address information tab and verify the details.
Set up an expense account for vendor payments
Set up an expense account in QuickBooks Desktop
- Begin by clicking on the Edit option and then selecting Preferences.
- On the left side, you will need to select Tax: 1099.
- Then, you will need to click on the Company Preferences tab.
- You will see the option Do you file 1099-MISC forms? Next, you will need to select Yes at the top.
- Next, you will link your account to the boxes on Form 1099-MISC.
- Now, QuickBooks 1099 Wizard will be shown.
- List of QuickBooks Desktop accounts used to track payments to 1099 vendors.
- Click the drop-down arrow in the Apply payments to this 1099 box column to select the correct 1099-MISC box.
- Box 7: Non-employment Compensation is used to pay the majority of Vendors.
- You must add these payments to the 1099 account or select a box on the 1099-MISC.
- After accounts have been mapped successfully, select Save & Close.
Points to be Consider
- In the address section, provide the correct state abbreviation and zip code.
- For a vendor who is a person, the First Name, Middle Name, and Last Name fields are required to be filled with the name of the vendor.
- If the company name is known but the individual’s name is not known, leave the Company Name blank field.
- Select the option Tax Setup and then choose the 1099-eligible vendor.
- Enter the supplier’s tax ID number in the Vendor Tax ID Field and click OK.
- Repeat steps 2-6 for every vendor that must receive a 1099.
Identify the companies and vendors listed on the 1099-Misc form.
QuickBooks Desktop uses three name fields:
- Company Name
- Full Name
- Vendor/Contractor Name
Print the 1099s Form in QuickBooks
Read the following to learn the printing procedure of the 1099 form for the IRS in QuickBooks Desktop, QuickBooks Online, and QuickBooks Desktop for Mac.
Few Important Tips that you should consider while printing 1099
- Keep remembering that you have to use a page-oriented printer to print separate copies rather than all at once.
- Before putting your pre-printed forms in your printer, you should avoid collecting them. First, you can load all of the Copy 1 forms. Now you can load and get prints of the Copy 2 forms after all of the Copy 1 forms have been printed for each vendor.
- Copy B (perforated) is for the suppliers/vendors, and copy A (non-perforated) is for the IRS. So, there can only be print 2 vendors per page.
- You will be prompted by alignment to choose -1 in order to decrease the print size or +1 to increase it.
- This selection allows you to adjust the print by 1/100th of an inch.
How to Print 1099 in QuickBooks Desktop
If you’re using the QuickBooks Desktop version, and the QuickBooks Desktop is installed in your system as an application here is the procedure to print the 1099 form in QuickBooks Desktop. There are so many chances of facing printing errors while printing the 1099s form in QuickBooks Desktop. So carefully, follow the procedure to print.
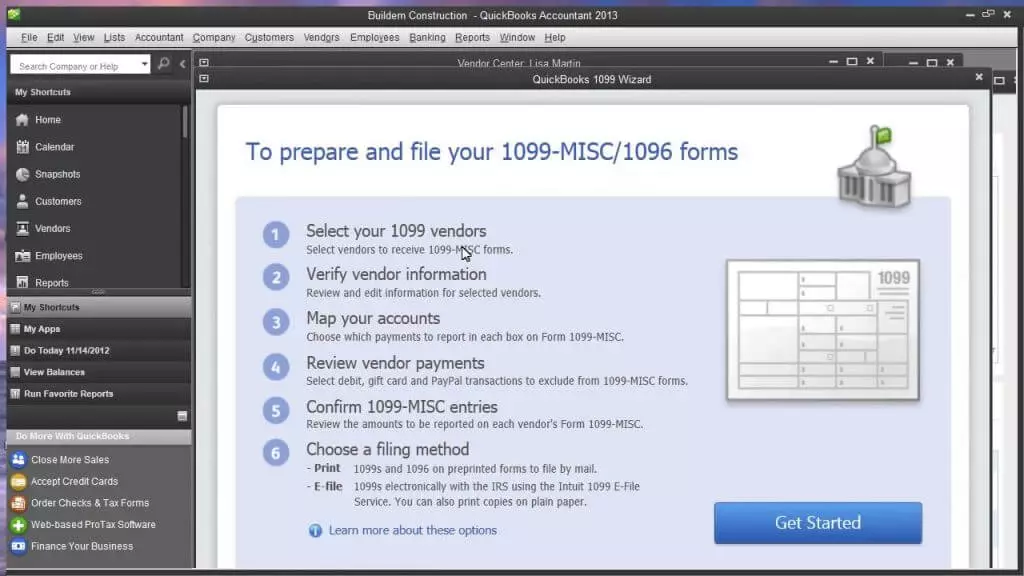
Step 1: Prepare Form in 1099 Wizard
- From the File Menu at the top select Print Forms and then select 1099s/1096.
- Click on ‘Get Started’ as soon as QuickBooks 1099 Wizard will open.
- Review and finalize the company’s tax information and contractor’s information and then continue.
- Select 1099s in the next window named ‘Choose the filing method’.
- And then enter the date.
It’s important to fill in the information correctly before printing. Therefore, the QuickBooks wizard detects the issue and then flags it. You can move forward after resolving the problem.
Step 2. Print on Blank Paper Align the Printer and Form
First, you should use some blank paper to align the printer, and if you are satisfied with the outcome only then use the pre-print form.
- Select a vendor.
- Then choose form-type ‘Print 1099’.
- Insert a blank paper in the printer.
- Place the sample print on the pre-printed form then hold both of them against a light source.
- Check whether both are aligned or not.
- Use ‘Fine-tool alignment’ to line up the form and the printer.
- Again print a sample and compare.
- Do it until you find the precise alignment.
You can save the alignment details if you print the 1099 form again in the future.
Step 3. Load Pre-Printed 1099 Forms
After the preparation and alignment of the 1099 forms. You are now ready to print these forms. This process is the same as it was in QuickBooks Online.
- First, load all COPY As and print them.
- Then load all COPY Bs and print them and so on.
Now all your forms are prepared and printed. You can separate them and send them to the IRS in tax form envelopes.
How to Print 1099 in QuickBooks Mac
Here are the steps to print 1099 in QuickBooks Mac.
- Open the File Menu and Select ‘Print Form 1099’.
- After that 1099 wizard will pop up click on ‘Get Started’.
- Now select vendors who are applicable for the 1099 form.
- Double-click on the vendor’s name to edit his information.
- You can view the included and excluded payments of 1099. Click on ‘Next’ when done.
- Next, click on the ‘Print 1099’ option.
- First, print on the blank paper to check the alignment.
- Change your alignment settings if it doesn’t line up perfectly.
- After perfect alignment, select all the vendors you want to print. Then click on the ‘Print 1099’ option.
- At last, confirm the printer setting and start printing.
How to print 1099 in QuickBooks Online
Before printing the 1099 form in QuickBooks Online, first of all, you need to prepare the 1099 form in QuickBooks. And then you need to, align the printer with the form using blank paper and finally print using pre-print 1099-MISC Form.
Step 1. Prepare 1099 Form
- In the QuickBooks dashboard select ‘workers’ and then select ‘Contractor’ in the next window.
- A list of contractors will come up next. In this select the ‘Prepare 1099s’ option.
- In the next window review the company’s tax information, and contractor’s information, and confirm the payments.
- After reviewing all the information finish preparing 1099.
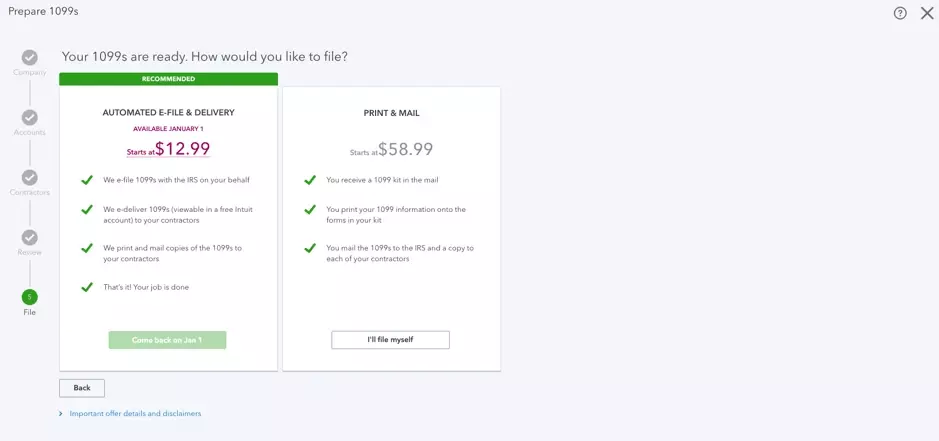
After finishing the 1099 form a new window will pop up.
In this window, since you’re filing by mail, therefore, you need to click on “I’ll file myself”. Then, QuickBooks will recommend you buy one of their QuickBooks 1099 kits but this isn’t required if you have pre-printed 1099 Forms.
Step 2. Print on Blank Paper Align the Printer and Form
Before using a pre-printed 1099 form you should align the printer using blank paper. In that way, you can save the pre-printed forms.
- In this window first, select the 1099 form. (Select 1096 if you are printing the same.)
- Next, insert the blank page in the printer.
- Then click on the ‘ Print on the Blank Page’ option.
- Now place the sample print on the pre-printed form then hold both up against a light source.
- Now check whether they are lined up or not. ( If yes click on Yes, looks good! And if no then click on ‘No, it doesn’t line up’.)
- Use Fine-tool alignment to adjust the print.
- Then use another blank paper to print a sample.
- Repeat that until you’re not satisfied with the alignment of the print. (NOTE: We suggest you note down the alignment settings once you find the perfect one. It will help you in the future when you are printing more 1099 forms.)
Step 3. Load Pre-Printed 1099 Forms
Finally after preparing the 1099 forms and aligning the blank paper samples with the pre-printed 1099 forms. Now you are ready for the final step.
It will be convenient if you print each part of the form as a single batch.
- Load all COPY As and print.
- Then, load all COPY Bs and print, and so on.
Now after printing all the forms, you can separate them and send them to the (Internal Revenue Service) IRS in the tax form envelopes.
Steps to Print 1099 in Intuit Online Payroll Full Service
Here are some essential steps to print 1099 in the Intuit Online payroll full service:
- Navigate to the Intuit Online payroll full-service company.
- Then select the Tax Record option.
- Choose the Form year that you want to print from the drop-down Menu.
- Finish the procedure by hitting the Form to Print tab.
Troubleshooting QuickBooks 1099 Printing Issue
Follow the steps to troubleshoot the QuickBooks 1099 Printing issue:
For Chrome
- Open Chrome, and click on the triple dots shown in the upper-right corner.
- Now, choose the setting.
- Navigate to the privacy and security options.
- After that, click on the Site settings.
- Choose Additioal content settings then select PDF documents.
- Now open PDF files in Chrome.
- And try to print your 1099.
Firefox
- First, you have to select the Menu by opening Firefox and then navigate to the Options.
- Now, click on the General tab.
- Find PDF under Applications.
- Then, click on the dropdown and select your PDF viewer in the Action column.
- Try printing your 1099 forms again.
If Adobe isn’t the program that opens the document in PDF:
- You will have to right-click on the PDF.
- Next, you need to click Open with and choose Adobe from the dropdown menu.
- Try to print your 1099 forms once again.
Frequently Asked Questions
There are some questions listed below. Read and find your solution.
What is the minimum wage for completing the 1099 Form?
If anyone is paid more than $600 then the payer will issue a 1099- MISC form.
How to set the 1099 threshold in QuickBooks?
You can set a 1099 threshold by going through Expenses and then Vendors. Select the contractor’s name from the list then edit it. Check whether ‘Track payment for 1099’ is selected or not.
Where do I find the 1099 in QuickBooks?
If you lost a copy of your 1099 for your employees, you can retrieve it on QuickBooks. Here’s how you can print a copy of your employee 1099 form:
1. Create your 1099 in QuickBooks.
2. Once done, select the option I’ll file myself.
3. Choose the form type you are printing.
4. Make sure the forms are aligned properly and select Print sample on blank paper. If it’s all good, tick Yes, looks good! If not, click No, it doesn’t line up. Follow the on-screen instructions and hit Next.
5. To confirm contractors, click View selected 1099 contractors.
6. Select Print on 1099 forms and then Print.
7. Hit Next and then Done.
How do I pull a 1099 report in the QuickBooks desktop?
There are two reports in the QB Desktop that help you to review 1099 information. These are the 1099 summary and 1099 detail which show various information.
1. Go to the Business overview, reports.
2. Click Vendors & Payables.
3. Click either 1099 summary or 1099 detail.
What changes can I make to my 1099 form after it has been submitted?
You are allowed to make all types of corrections but be sure that there’s a date schedule for the future.
Type 1 Correction
1. The address that entered wrongly.
2. A wrong amount.
3. If forgot to tick the correct box.
4. Wrong box number reporting.
5. Did not file 1099 for the beneficiary.
Type 2 Correction
1. Name combination changes.
2. Incorrect tax year
3. Wrong Tax ID
4. Incorrect Recipient name
Is that possible to verify the status of My Tax Form Submission without the reference numbers? If yes then how?
Yes, you can verify the status of the tax form submission without a reference number by following the given steps:
1. First, you need to click on Forms.
2. Next, select Manage Forms
3. Choose the tax year to see the form status and then choose the payer name.
4. Now under the “status,” you will get some of the options.
Pending: Waiting to receive your forms.
Processing: Forms will be submitted after review it will be accepted by the IRS
Accepted: The form has been accepted by the IRS
The whole article was all about the printing procedure of 1099s form in QuickBooks Online, QuickBooks Desktop, and QuickBooks Desktop for Mac. Hopefully, this will be an informational source for you. If in case, you need help to get assisted then you can contact our well-trained, and certified QuickBooks ProAdvisors through this number+1-844-405-0904.