Read this article if you wish to know how to set up email in QuickBooks Desktop. As well as how to configure your email service settings also find steps to set up QuickBooks email invoices in Outlook and webmail. Meanwhile, you can also dial our toll-free number +1-844-405-0904 in the can you need to find a QuickBooks ProAdvisor for further help and assistance.
Table of Contents
QuickBooks Email Service & Settings
The QuickBooks email service allows you to send transactions through Webmail or Outlook. It can save a lot of time and effort. If you want to continue using this, you only need to update QuickBooks to the latest release version. Once your product is up to date, you can send a variety of forms, invoices, reports, and more.
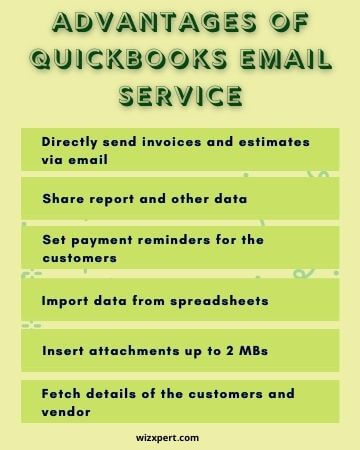
Few advantages & benefits of QuickBooks Email Service

- You can directly send email invoices and estimates to your customers.
- Share report and other types of data with you office colleagues and teammates.
- You can easily set payment reminders to the customers via emails to help increase cash flow.
- You can import data from spreadsheets and insert attachments up to 2 MBs.
- By setting up email in QuickBooks you can fetch details from the customers and vendors.
If you wish to set up an email in QuickBooks, you need the following credentials and information.
- Username
- Password
- Outgoing email server address
- Incoming email server address
- Incoming email server type
Also before proceeding, you have to set up your Outlook profile.
Note: If you already have an account in the Outlook profile, then you can proceed to the next step.
Configure Your Email Service With Quickbooks
When you work with QuickBooks Desktop products, you usually have several options for Email integration such as WebMail, Outlook, and QB E-mail. If you use Google Gmail and you want to select the WebMail option, but some people can’t get it to work with Gmail.
QuickBooks Email Options
You might not always see all three options for Email in your QuickBooks Desktop preferences. Several versions of QuickBooks do not provide all three, and even if you have a version that supports all three versions you might not see all of the options on some particular computer installations.
- Outlook: Outlook support is only available if you have already installed Microsoft Outlook on your computer. It is preferred email integration, as it provides you with the greatest degree of control.
- QuickBooks E-mail: It is the least favorite. It depends on Intuit mail servers and they do not offer the best features.
- WebMail: It was introduced in QuickBooks 2011 and it lets you connect through Gmail, Yahoo email, or your own web-based email service.

Set Up Your Email Service In Quickbooks Desktop
You can configure your QuickBooks to Email invoices, reports, and other transactions using webmail, outlook or Gmail, etc. Ensure that your Outlook is compatible with your version by checking QuickBooks Desktop system requirements.
Method 1: Set up “QuickBooks Outlook Integration”
- At first, you need to create a new Outlook email profile.
- If you already have an Outlook account, proceed to the next step.
- Collect the information to set up Outlook as your Email client.
- Quick tips: You may contact your ISP for the following information:
- Username
- Password
- Incoming email server address
- Incoming email server type
- Outgoing email server address
- Set up Outlook in QuickBooks.
- Quick tips: See Outlook is missing in QB Desktop Send Forms preferences if Outlook is unavailable in your QuickBooks.
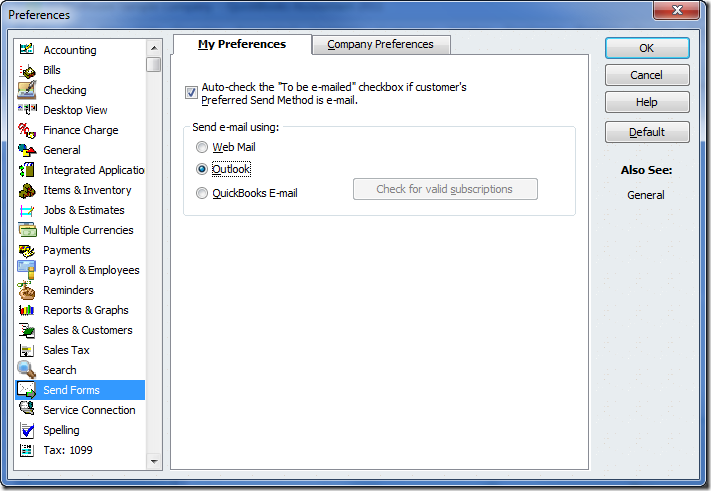
- Choose Preferences and select Send Forms, from the QuickBooks Edit menu.
- Then select Outlook and click OK.
Method 2: Set Up Secure WebMail with QuickBooks
In the latest versions of QuickBooks, you can use Secure Webmail for an easier connection to your Email provider, and Depending on your QuickBooks Desktop version, it’s only available for certain providers.
QuickBooks 2019: Available for Gmail, Yahoo Email, Windows Mail, Hotmail, and AOL (i.e. Mozilla Thunderbird Email Client*)
Note: Supports plain text version in Mozilla.
QuickBooks 2018: Available for Gmail and Hotmail/Live users in the US, UK, and Canada. QuickBooks 2017 R5 and newer: It’s available for Gmail users in the US only.
QuickBooks 2017 R4 and older: Secure Webmail is not available for this version.
Before you start setting up Web Mail
- First, you need to connect your Intuit account with the WebMail account, so that Secure WebMail can work without interruptions.
- By linking the Intuit account, you don’t have to enter the password every time you send an email.
- Make sure to create a strong and complex password while you link secure webmail to your company file.
- There are some hosting services like (Right Networks) that require you to provide login credentials of Webmail whenever you want to send an email.
Set Up Secure Web Mail in QuickBooks Desktop
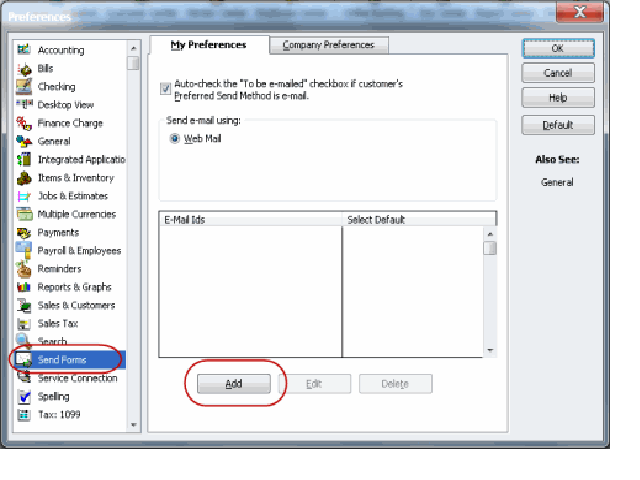
- At first, choose Preferences and then click Send Forms from the QuickBooks Edit menu.
- Again select the WebMail option and then click on Add button.
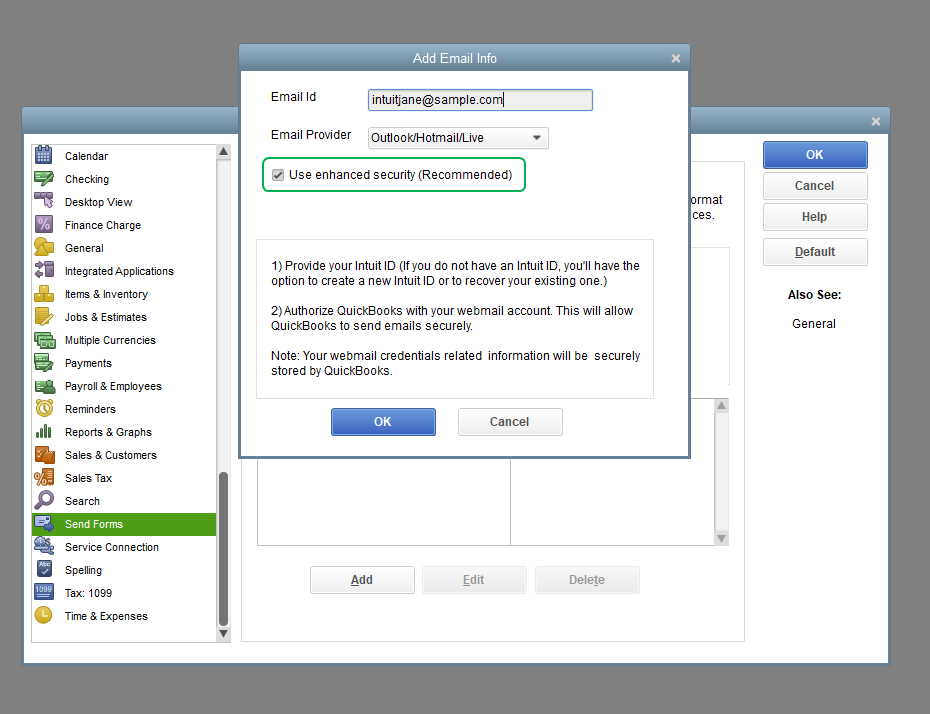
- After that choose your provider from the drop-down list and enter your email address.

- Ensure that the Enhanced Security checkbox is checked.
- Then click OK.
- When it is prompted, Sign in to the Intuit account. The username or email address you use may not be the same as the one you are connecting to QuickBooks.
- Your webmail provider’s login page will display on the screen.
- You need to Sign in and choose to grant Intuit access.
Method 3: Set Up QuickBooks Email
- First, select the “QuickBooks Email” option in the Send email using section.
- Now you need to check if you have a valid subscription or not. Because QuickBooks Email feature only works if you have an active subscription of Intuit services like QuickBooks Payroll, IMS (Intuit Merchant Service), Accountant’s Copy File Transfer, QuickBooks Enterprise Full service, or QuickBooks Billing Solution.
- After that, you can follow the on-screen instructions to set up the QuickBooks Email service.
- Then, you need to fill in some mandatory details like Username, password, email address, server details, incoming & outgoing email settings, and then you are done.
NOTE: Make sure to note down the email address to which you have send forms because QuickBooks does not save any copy of the email id.
If you are using QuickBooks Desktop in the United States:
| ISP (Internet Service Provider) | SMTP Server | SMTP Port |
|---|---|---|
| 1AND1.com | smtp.1and1.com | 587 (SSL enabled, with password) |
| ADELPHIA | mail.adelphia.net | 110 |
| AOL | smtp.aol.com | 465 or 587* (SSL enabled for incoming and outgoing mail server) |
| BELL SOUTH | mail.bellsouth.net | 110 |
| COMCAST | smtp.comcast.net | 587 |
| COMPUSERV | smtp.compuserve.com smtp.aol.com | 110 or 587 |
| COX Business | smarthost.coxmail.com | 25 |
| COX CENTRAL | smtp.central.cox.net | 25 |
| COX EAST | smtp.east.cox.net | 25 |
| COX WEST | smtp.west.cox.net | 25 |
| EARTHLINK | smtpauth.earthlink.net | 25 (with password) |
| GODADDY | smtpout.secureserver.net | 80 |
| LYCOS | smtp.mail.lycos.com | 25 |
| MICROSOFT OUTLOOK 365 | outlook.office365.com | 587 (SSL enabled) |
| NETSCAPE | smtp.isp.netscape.com | 25 (SSL enabled) |
| PRODIGY | smtp.prodigy.net | 25 (SSL enabled) |
| ROADRUNNER | smtp-server.sc.rr.com | 587 |
| SPRINT PCS | smtp.sprintpcs.com | 25 |
| VERIZON | outgoing.verizon.net | 465 |
| VERIZON YAHOO | outgoing.yahoo.verizon.net | 465 |
If you are using QuickBooks Desktop in Canada:
| ISP (Internet Service Provider) | SMTP Server | SMTP Port |
|---|---|---|
| MICROSOFT OUTLOOK 365 | outlook.office365.com | 587 (SSL enabled) |
| BELL MAIL | smtphm.sympatico.ca | 25 (or 587 if port 25 does not work) |
| BELLNET | smtpa.bellnet.ca | 25 |
| CLUB INTERNET | smtp.club-internet.fr | 25 |
| COGECO | smtp.cogeco.ca | 465 |
| COMCAST | smtp.comcast.net | 465 |
| EARTHLINK | smtpauth.earthlink.net | 587 |
| GMAIL | smtp.gmail.com | 587 |
| HOTMAIL | smtp.live.com | 587 |
| LAPOSTE | smtp.lineone.net | 25 |
| smtp.aol.com | 587 | |
| MSN | smtp.live.com | 25 |
| MTS | smtp.mts.net | 25 |
| NETSCAPE | smtp.isp.netscape.com | 25 |
| NETZERO | smtp.netzero.com | 25 |
| NEUF | smtp.neuf.fr | 25 |
| ROGERS | smtp.broadband.rogers.com | 25 |
| SASKTEL | mail.sasktel.net | 25 |
| SHAW | shawmail.cg.shawcable.net | 25 |
| SKYNET | smtp.skynet.be | 25 |
| SYMPATICO | smtphm.sympatico.ca | 25 |
| TELUS | smtp.telus.net | 25 |
| VIDEOTRON | relais.videotron.ca | 25 |
| YAHOO | smtp.mail.yahoo.com | 465 |
Method 4: To set up a regular Webmail:
Internet Service Provider controls the WebMail servers. QuickBooks automatically fill out the information for the most common service providers, such as Gmail, Yahoo, and Hotmail, etc.

- Choose Preferences and click Send Forms from the QuickBooks Edit menu.
- Then select WebMail and click on the Add button.
- After that choose your provider from the drop-down list and enter your email address.
- Then click OK.
Important:
- QuickBooks Desktop will prompt you to enter your webmail password the first time you send an email using regular webmail, Unlike with Secure Webmail.
- If you have a problem in opening an account by password in QuickBooks Desktop, note that webmail providers (Gmail, Yahoo, etc.) require users to check the account setting for two-step verification.
- For Cox users: When sending emails The standard SMTP setting of Cox is not to use SSL or login information. QuickBooks requires login information and prefers SSL connections and therefore, using port 25 and no SSL connection with SMTP does not work with QuickBooks Desktop. Use SSL with these alternatives port 587 or 465.
- For CableOne users: Use the following credentials since CableOne uses Google servers.
- Email Address: Your Email
- Email Provider: Gmail
- Port: 587 or 465
- SSL: Yes
The Bottom Line
Note: If you do not like the Secure webmail, Quickbooks desktop will prompt you to enter your WebMail password the first time you send an email to regular webmail.
If QuickBooks will not accept your webmail password.
For Cox users: The standard SMTP doesn’t work with QuickBooks. You can use SSL with ports 587 and 465.
For CableOne Users: You should follow the above steps since cable one using google servers.
Email Address: Your Email
Email Provider: Gmail
Port: 587 or 465
SSL: Yes
I hope now you can set up the QuickBooks email service on QuickBooks Desktop. And also able to send an invoice and receive reports and other transactions to your QuickBooks Desktop using your preferred email id either by outlook or webmail.
However, if you need any kind of assistance feel free to dial our toll-free number +1-844-405-0904.
