Want to access your company file in multi-user mode, over a network? If yes, then you must know that it is quite impossible without the QuickBooks database server manager. It allows you to share your company files with other computers over your network. In this article, we will guide you, on how to download, install, set up, and, update the QuickBooks database server manager. In the meanwhile, for further assistance, you can find a QuickBooks ProAdvisor by dropping a call to our toll-free number+1-844-405-0904.
Table of Contents
What is QuickBooks Database Server Manager
QuickBooks database server manager is the one and only way to use multiple versions of QuickBooks Desktop over a network. It develops the network data file (.ND) for the company file in the host computer to share the file with multiple users. It is also called Intuit’s personal database management tool.

Some Important Points about QuickBooks Server Manager
- If you want to use multiple versions of QuickBooks Desktop then you should install each version of the Database Server Manager.
- When you want to use multiple versions of QuickBooks Desktop, you may install the Database Server Manager in chronological order from oldest to newest for each version.
- If you are installing multiple versions of Database Server Manager it will give you only multiple versions of processes but it cannot provide multiple versions of the software.
- Clear that the year’s database services are running in the background when the Database Server Manager works for each year. Sure that the services of Windows interface which accessible via the Windows and the Control Panel then this service is listed as QuickBooks DBXX, where the XX shows the number of versions (ex.”27″ is for QuickBooks Desktop 2018 and “28” for QuickBooks 2019).
- Each QuickBooks version adds a user when the QB Database Server Manager is installed. (ex. QBDataServiceUser28 for 2018 and QBDataServiceUsers27 for 2017).
Uses of Database Server Manager Tool
Before setting up QuickBooks Database Server Manager, you need to know the uses of QBDM.
- It helps in detecting the new company file by checking the local storage device.
- For accessing multiple users it is necessary to scan the company’s file and QBDM helps in scanning the company’s file automatically.
- QBDM tool also helps in creating the .ND files automatically on the host server.
- It is used in tracking the local hard drive of your company.
How To Download and Install QuickBooks Database Server Manager
Follow the procedure to download, and install the Intuit QBDBMS;
Step 1: Download the Database Server Manager Update
The QuickBooks database server manager is a part of the QuickBooks Desktop file. If you already have the QuickBooks Desktop then you need not download the QBDBMS separately. And if you haven’t then, download QuickBooks Desktop. But keep remembering that the Database Server Manager update version is needed for your system.
Step 2: Install the Intuit’s Personal Database Manager Tool
You need to install the tool in the server system, where you host your company files. Follow the below-given steps to install the tool successfully.
Note: If you are a user, who hosts multiple versions of QuickBooks Desktop on a network, then install them in chronological order from oldest to newest.
- First of all, close all of the running programs (including QuickBooks) on your server computer.
- Now open the downloaded file ‘Setup_QuickBooks.exe’ to install the tool.
- After that, QuickBooks will instruct you to follow some of the steps onscreen. Just follow them.
- And keep your license and product number beside you.
- QuickBooks will show you 2 types of installation; Custom or Network Options, and Express options.
- Select the ‘Custom or Network Options’, as your installation type, and the ‘Next’ option.
- After that, select any one of the options for the network setup;
- If you require Database Server Manager and QuickBooks Desktop on your server computer, then click on I’ll be using QuickBooks Desktop on this computer, AND I’ll be storing…. We highly advise this option.
- If you need only Database Server Manager on your server computer, click on I will NOT be using QuickBooks Desktop…
- Go with the rest of the onscreen instructions. When you’re ready, click on Install. Windows may ask you for permission.
- Allow these users to access the folders that hold your company files. Whenever you set system-level permissions, you can see these users.
Note: QuickBooks generates a new Windows user for every version of Database Server Manager. For example, Data Server Manager 2020 creates the show as QBDataServiceUser20.
Configure the Database Server Manager
If you want to set up all these things as default then you can avoid this configuration process and can jump to Step 3.
- Click on the ‘Windows Start’ button.
- Type “Services” in the search bar.
- Open the Services, and launch the QuickBooksDBXX (XX is the version number).
- After that, find the Services Status section from the ‘General’ tab.
- If the service status is in running mode then stop it.
- Go to the ‘Startup Type’ to select the ‘Automatic’ option.
- Select the Local System Account option from the ‘Login’ tab.
- After that go to the ‘Recovery’ tab.
- There you need to select the ‘Restart the Service’ option from each of these menus;
- First failure
- Second failure
- Subsequent failures
- Again visit the ‘General’ tab, and click on the ‘Start’ option to restart the database server manager.
Step 3: Set Up the Firewall Permission
It is the most important step to set up the firewall permission to run the database server manager perfectly. This will make clear communication between the QBDMS and the server system.
So, ensure that the permission is accessed for the server manager, and if it isn’t yet then set up the firewall port.
Step 4: Update the Database Server Manager
This step is not necessary during the installation time, it may be required later. But whenever you need the update the database server manager, you can easily do it by updating the QuickBooks Desktop.
It has no individual procedure to update, it will update automatically when you will update your QuickBooks Desktop version.
Setup of QuickBooks Database Server Manager
- For setup of QBDSM you need to open the QuickBooks Database Server Manager first. It helps in scanning the files that are configured for the use of multiusers.
- You can add the new QuickBooks company file to the server. For this click on Add New Button.
- Use the Administrative tool for updating Database Server Manager.
- Make sure that company files are connected to the server.
- Ensure that every user must log in to the company files.
- Use the service administrative tool to change the user service status.
- You have to add the function of Upgrading and Uploading in QuickBooks Server.
How to Use QuickBooks Database Server Manager
After the complete installation of QBDBMS, you need to scan the company files to access them on other computers over a network.
Here is the setting up, and use process of the server manager;
Step 1: To Open Server Manager
- Go to the Start button.
- Click on the ‘Programs’ option.
- And select, QuickBooks.
- Then choose ‘QuickBooks Database Server Manager’.

Step 2: Scan the Folders
When you store all company files on the server must be scanned once to ensure that they’re configured to allow other users access to these company files easily.
- Open the QuickBooks Database Server Manager on the server system.
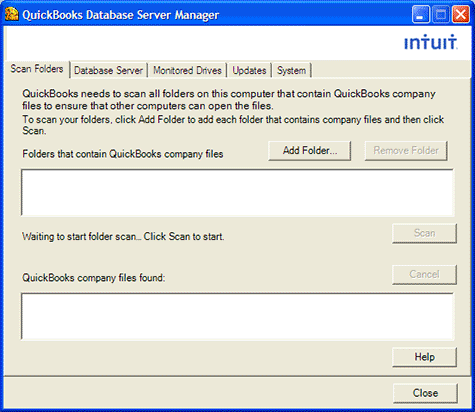
- Click on the Scan Folders tab.
- Then, click ‘Browse’ to select the folder, that holds company files (QBW).
- After that, click on the ‘OK’ option.
- Select the ‘Start Scan’ option to start the scanning process.
- After the scanning process, you can access the company files in the ‘QuickBooks company files found’ folder.
- If you can’t find the file that you want to scan then scan the whole disk.
Note: The 2019 version of the QBDBMS shares all of the folders, So you can set folder permission to give access to the specific files through the database server manager.
Step 3: Monitor the Drives
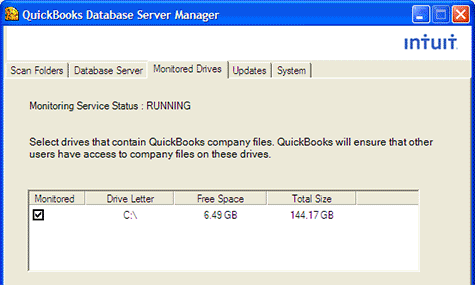
The monitor drives tab holds, all of the scanned folders. Here you can monitor all of the folders from the drive. In this way, you will not need to rescan the folders further, if you will make any changes to the company files.
- Visit the ‘Monitored Drives’ tab.
- Checkmark on the box, where the company files are stored.
- Make sure to only add drives that hold the company files.

Exception: It is not allowed to monitor mapped drives.
Note: It’s not possible to display and monitor the mapped drive.
Step 4: Manage the Database Server Tool
Apart from the above-discussed tabs, there are some other tabs that help you to keep everything running smoothly. Like;
System Tab: It helps you to detect the location of the installed data server manager tool on the computer.
Database Server Tab: It shows the real-time status of the tool, by which you can easily know, who is connected to the tool.
Step 5: To Add a Folder

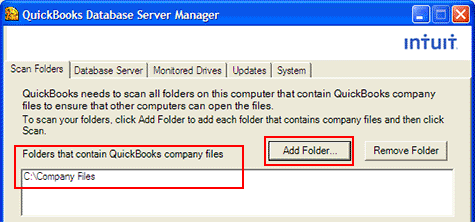
- Click on the add folders button.
- Select the folder you want to add.
- The position of this folder is under the folders that contain the QuickBooks company file.
Step 6: To Remove a Folder
This step is optional for you. If in case, you need to remove any folder then can easily remove the folder by clicking on the particular folder and then clicking the Remove Folder.
Step 7: Restart the QB Database Server Manager
After the setup of all settings tab, restart the database server. Follow the procedure to restart it;
If you have installed both QuickBooks Desktop and QuickBooks Database Server Manager;
- Launch the QuickBooks Desktop on the server system.
- Click on the ‘Open a Restore Company’ option from the ‘File’ menu.
- Select the ‘Open a Company File’ option to open a file.
- Then click ‘Next’.
- Tick the mark on the Open file in the multi-user mode box, and open it.
- After that, log in to the company file, using the id, and password.
- Select the ‘Close Company/Log off’ option from the ‘File’ menu. (This will close the file on the server.)
- At last, go to the ‘Start’ button, type: “Database”, and open the QuickBooks database server manager.
If you have installed the QuickBooks Desktop only;
- Open the ‘Control panel’, and select the ‘Administrative Tools’ section.
- Choose the ‘Services’ option from the list, and right-click on the QuickBooksDBXX service. (XX is the version of QuickBooks)
- At last, click on the ‘Restart’ option.
Step 8: How to Repair QuickBooks Database Server Manager
To repair the QuickBooks Database Server Manager you need to follow the steps given below:
- Open the QuickBooks and go to the file menu options.
- Next, go to the Utilities for Rebuild the Data.
- Go to the information window and then select the OK button.
- Wait for a few minutes until and unless the repair is completed.
- After completing the repair processes you have to click on OK.
How to Uninstall QuickBooks Database Server Manager
If in case, you need not run QuickBooks in multi-user mode and want to uninstall the Intuits personal database server manager then you can follow the below procedure to uninstall it;
- Go to the Programs and Features under the Control Panel.
- Now look for the QuickBooks Database Server Manager.
- Click on Uninstall/Change at the top of the window.
Now, go with the on-screen instructions to Uninstall/Remove the program.
How to Install Linux Database Server Manager
If you want to install QuickBooks Desktop Enterprise Linux Database Server Manager, you must be familiar with the Linux operating system, understand network operations & have administrator access to install & configure the software.
Components
The Linux database server manager consists of three components:
- The Database server files
- The qbmonitord daemon
- The qbmonitord configuration file (qbmonitord.conf)
System Requirements
| Hardware and Software | Minimum | Recommended |
|---|---|---|
| Processor | 1.2 GHz Intel Pentium 3 | 2 GHz Intel Pentium 4 |
| RAM | 1 GB | As much as possible |
| Disk Space | 2.5 GB | Additional space for the QuickBooks company files |
What functions does QuickBooks Database Server Manager offer?
- You can access each company file’s list of users who are currently logged in, as well as the company files that are currently connected to the server.
- You can get the status the QuickBooks Database Server’s status, which shows its services but when the server is hosting the firm files, all services should be active.
- There is an option of changing the status of the services. For this, Use the Services Administrative Tool to configure the services QBDBXX if you wish to change.
How to use updated features
- Click the “Start” button first, then “Program,” “QuickBooks,” and then “QuickBooks Database Manager.”
- After that, select “Updates.”
- Follow the directions on the screen in order to install the updates.
Frequently Asked Questions
We are going to discuss some most frequently asked Questions about the QuickBooks database. Read the following questions and their answers.
Where do I find the QuickBooks Database Server Manager?
To open QuickBooks Database Server Manager, go to the system that hosts your company file.
1. Click on the Windows Start button and type QuickBooks Database.
2. You can find the QuickBooks Database Server Manager file. Click on it to open.
Does QuickBooks use a database?
QuickBooks uses a powerful, industry-standard SQL database. It helps to share the company file over a network to the same or remote server. The SQL database uses client-server technology in multi-user mode to manage access to company files.
How do I set up my QuickBooks server?
To set up for QuickBooks Server, you need to adjust settings in QuickBooks, Windows, and your server. Follow the below steps to do so:
1. Set up QuickBooks
2. Set folder permission
3. Install Database Server Manager
4. Set admin rights
5. Use Database Server Manager
6. Turn on the hosting
It’s all about the QB database server manager. Hopefully, now you can download, install, and update the QBDBMS itself. Still, if you have any kind of queries related to this topic then feel free to contact our QuickBooks ProAdvisors through the toll-free number [quickbooks].
