Using the Fixed Assets Manager (FAM) in QuickBooks Desktop, one can calculate the reduction in the value of Fixed Assets by following the standards that are published by the Internal Revenue Service (IRS). In this article, we are going to show you how to set up Fixed Asset Manager in QuickBooks Desktop and also discuss some of the terminologies, depreciation methods, and predefined reports in the Fixed Asset Manager (FAM) so that you can manage your fixed assets information more effectively. If you are in any trouble, you may also contact our team of Intuit certified ProAdvisor to get your problem solved. Dial +1-844-405-0904.
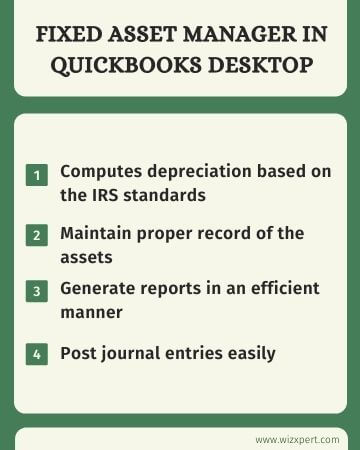
Table of Contents
Set Up Fixed Asset Manager in QuickBooks Desktop
Here, we are going to show you how to set up the Fixed Asset Manager so that you can work with QuickBooks Company File easily.
It is very important to set up the Fixed Asset Manager properly, due to the reason QuickBooks Desktop and QuickBooks Fixed Asset Manager both have different data files. If properly set up then it will be much easier to manage the fixed asset information.
Follow the instructions mentioned below carefully to set up QuickBooks Desktop Fixed Asset Manager.
STEP 1: Set up the Income Tax Form
It is important to set up your income tax form, in order to track asset depreciation in a perfect tax line by using the FAM.
If you are just starting to create a new QuickBooks Company File
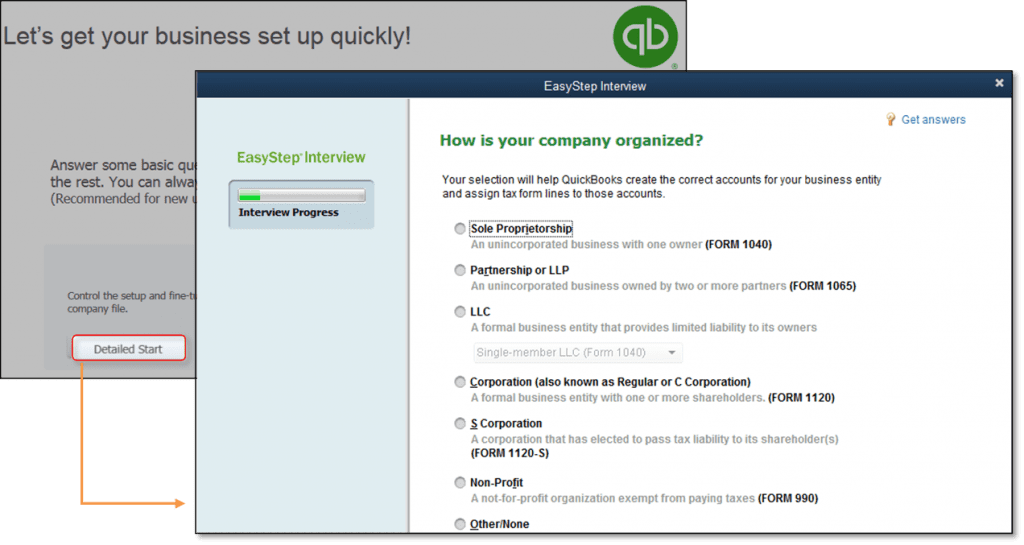
- In the No Open Company window, select the Create a new company option and then click on the Detailed Start button.
- In the Easy Step Interview window, you will be asked, How is your company organized? Here, you will be able to see options like Sole Proprietorship, LLC, LLP, etc. You need to select your income tax form.
- And finally, finish creating your company file.
If you already have an existing QuickBooks Desktop Company File
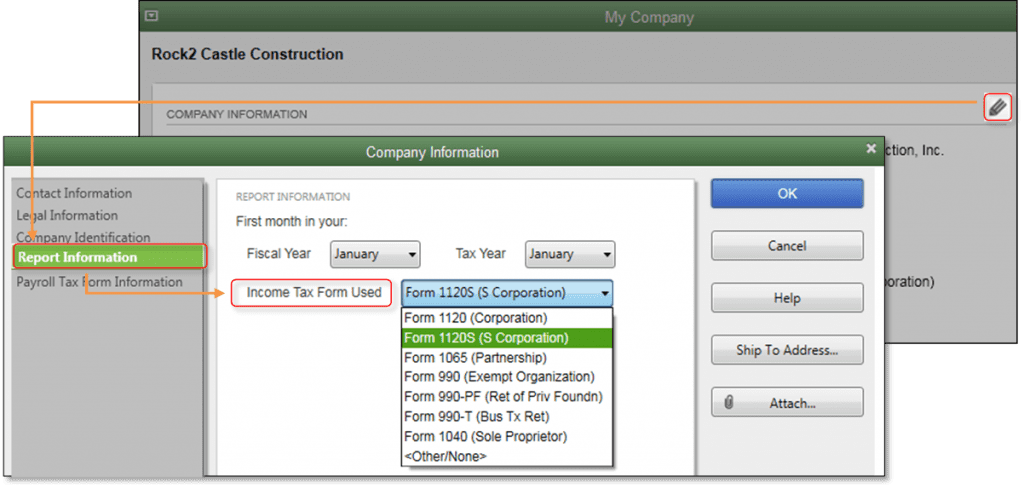
- Go to the top menu bar and click on the Company menu and then select the My Company option.
- Then, click on the Pencil icon on the right side of the company information and then select Report Information from the left side navigational panel.
- After that, click on the Income Tax Form used drop-down menu and select the income tax form that you use for your business and then click on the OK button.
STEP 2: Set up a General Ledger (G/L) account in QuickBooks Desktop
You have two ways of tracking the assets, you can either choose the Minimal Account Setup, where the minimum number of accounts is used or But if choose the Ideal Account Setup you’ll be able to create a separate account per fixed assets.
Along with the asset account, FAM post depreciation in the Depreciation (Expense) account, and another offset entry on the Accumulated Depreciation account. It is very important to create a separate General Ledger account before you set up the FAM.
NOTE: If you don’t know about terms like Accumulated Depreciation account then don’t worry, we’re going to elaborate it in the latter part of the section.
Minimal Account Setup
| Account Name | Type |
| Fixed Asset Account | Fixed Asset |
| Accumulated Depreciation account | Fixed Asset |
| Depreciation Expense Account | Expense |
Ideal Account Setup in Charts of Account
- First of all, for each asset or group of assets that you want to depreciate, you need to create a Fixed Asset account. For example, If you want to create a fixed asset account called Computer, Vehicle, or Furniture.
- First, you need to go to the Chart of Accounts.
- Right-click here and select the New option.
- Here, select the Fixed Asset, and then fill out the required fields.
- After that, click on the Save & Close.
- You need to add two sub-accounts for every fixed asset account that you have created. One sub-account will be used for tracking the cost while other sub-account will be used for tracking the accumulated depreciation. Once you have done this, it will be a matter of seconds to tell the book value and accumulated depreciation cost of assets.
- First of all, go to the Chart of Accounts.
- Right-click here and then select the New option.
- Then, select the Fixed Asset and checkmark the box stating Sub-account of and then from the drop-down menu select a suitable parent account.
- Then, you need to fill the necessary information.
- And finally, click on the Save and Close button.
- For tracking the depreciation expenses, you need to create an expense account and then name it Depreciation Expense.
- First, you need to go to the Chart of Accounts.
- Select the New option by right-clicking in the window.
- Here, select the Expense, and then fill out the required fields.
- After that, click on the Save & Close.
STEP 3: Fixed Account Manager (FAM) Client Wizard
Go to the Accountant menu and then select the Manage Fixed Asset option, by doing this, a new QuickBooks Fixed Asset Manager window will open. Here, you need to select any one option based on your business.
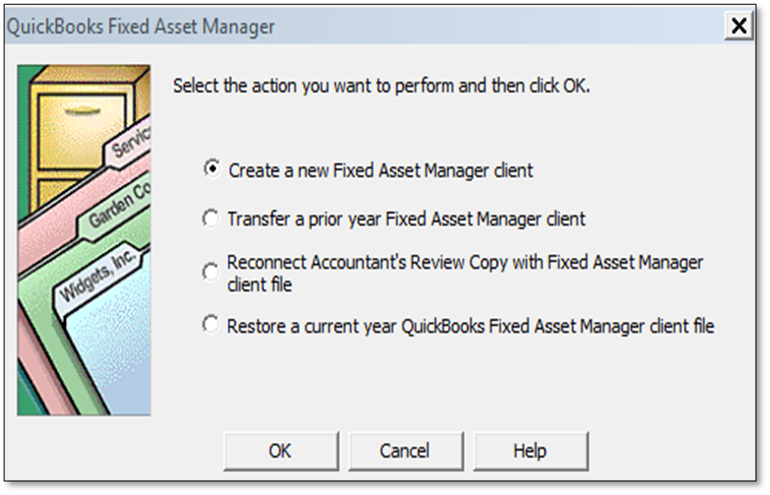
There are four options available and we have elaborated them for your convenience so that you can choose the appropriate one.
- Create a new Fixed Asset Manager client: For the first time user, this option will be a perfect choice.
- Transfer a Prior year Fixed Asset Manager client: Choose this if you want to transfer any prior year fixed assets into the latest Fixed Account Manager (FAM).
- Reconnect Accountant’s copy with the Fixed Asset Manager client file: With the help of this option, you will be allowed to bring the current year’s asset into the QuickBooks company file.
- Restore a current year QuickBooks Fixed Asset Manager client file: If you have previously created a backup Fixed Asset Manager File then with this option you can restore it. Don’t confuse it with the QuickBooks Desktop backup file, FAM backup file is created within the FAM Program. (File>Backup)
The Fixed Asset Manager (FAM) Client wizard
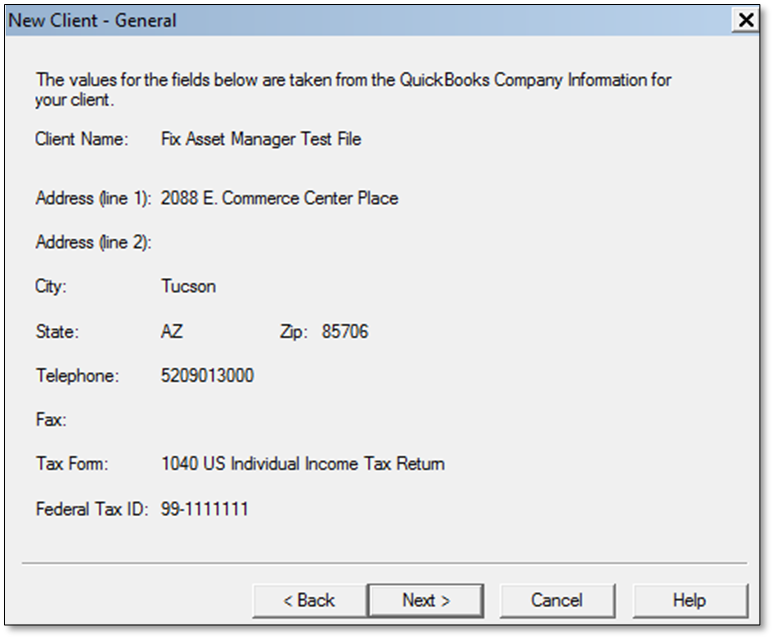
- General: Here, you will see a brief summary of company information which is derived from the QuickBooks Desktop Company File.
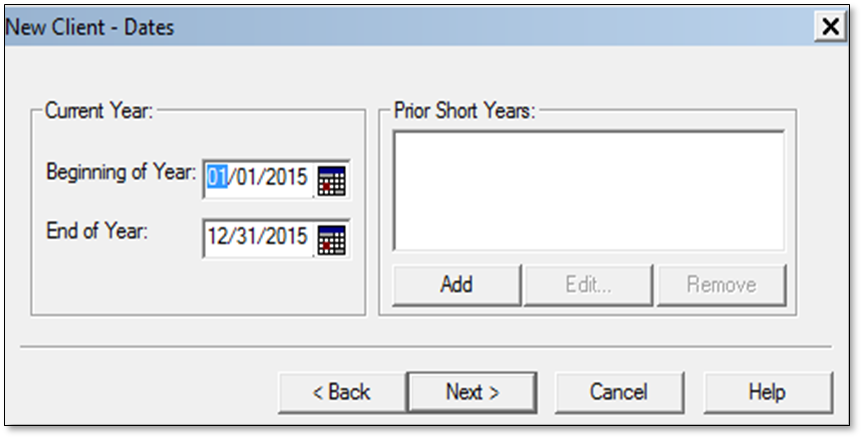
- Dates: All the calculations and reports in FAM are based on a definite period, unlike QuickBooks Desktop. Here, you need to enter the beginning and ending date of the current year for which financial statements are created. With the help of the dates that you provided, the program will automatically calculate the prior year depreciation as soon as an asset is entered in the FAM. However, these values can be overwritten by the values from the client’s current depreciation schedule. At the year-end dates, users need to follow the year-end procedure.
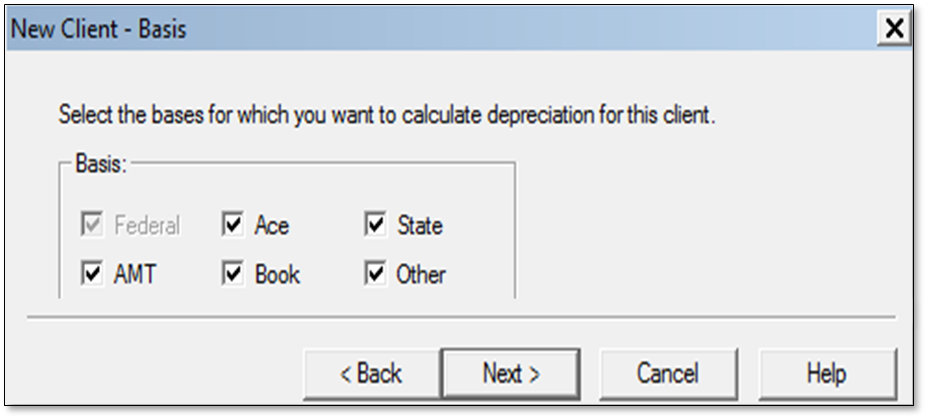
- Basis: From here, you can set which tabs should be visible at the bottom half of the Asset screen.
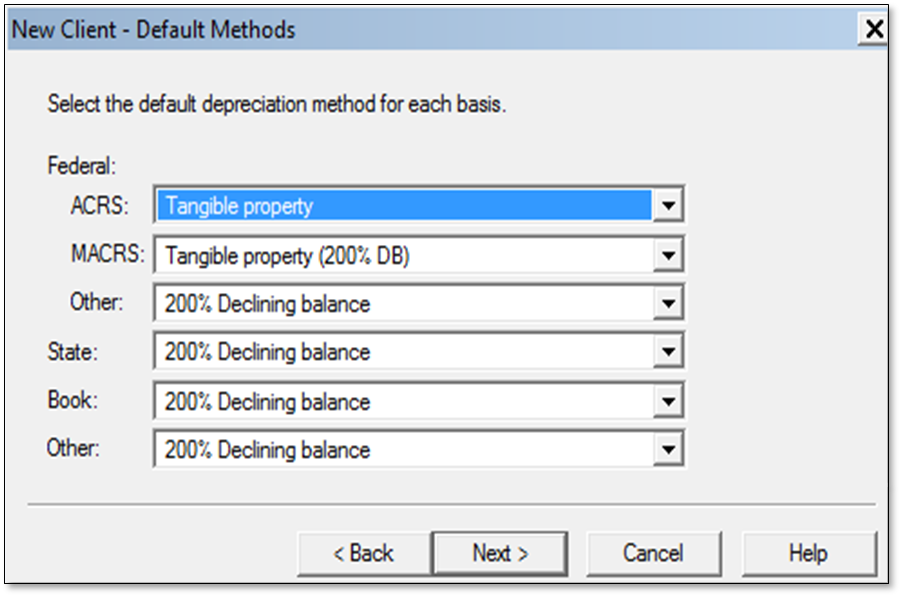
- Methods: From here, you can set a default depreciation method for each basis and newly created assets. NOTE: To save time while entering new assets, you can choose one of the most used settings for your own accounting settings.
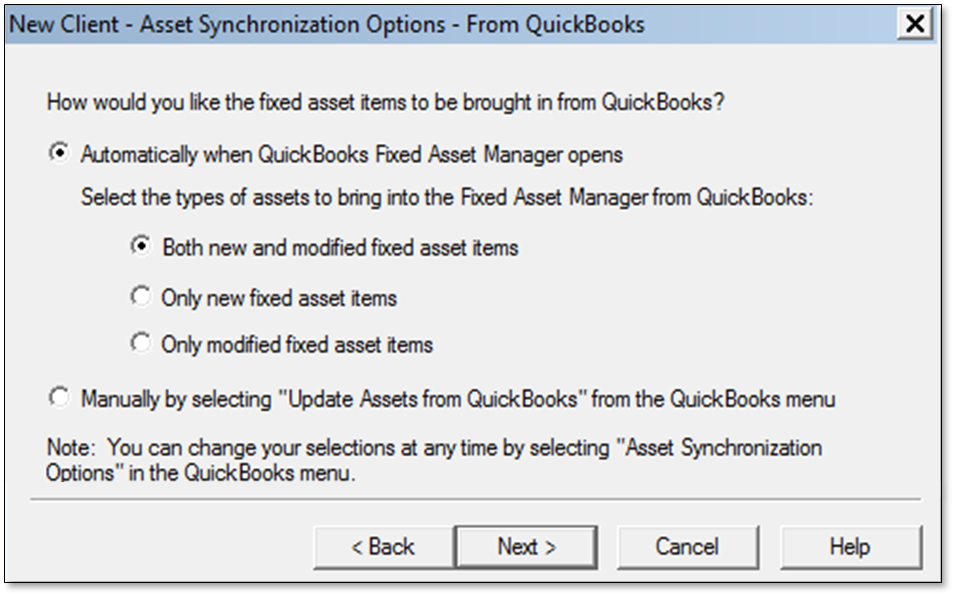
- Asset Synchronization (From/To): From here, you can control which data should or shouldn’t move between the FAM and QuickBooks Desktop.
STEP 4: Add Assets in Fixed Asset Manager
The steps we are going to mention below will only work if you didn’t set up your Fixed Assets in QuickBooks Desktop or if you are willing to move the data from Fixed Asset Manager (FAM) to QuickBooks Desktop. At the time you set up the FAM, data from your QuickBooks company file will automatically transfer to the FAM. Depending on the sync settings you choose in the FAM, the information will continue to transfer between both programs.
- Add an asset to the Fixed Asset Manager (FAM).
- Go to the Toolbar and then select Add option.
- After that, you can either press the F4 button on your keyboard or,
- Select the Add Asset option from the Asset menu.
- Once the asset is added, in the top half portion, you can add information like description, purchase order number, Federal form used, a general ledger account, etc.
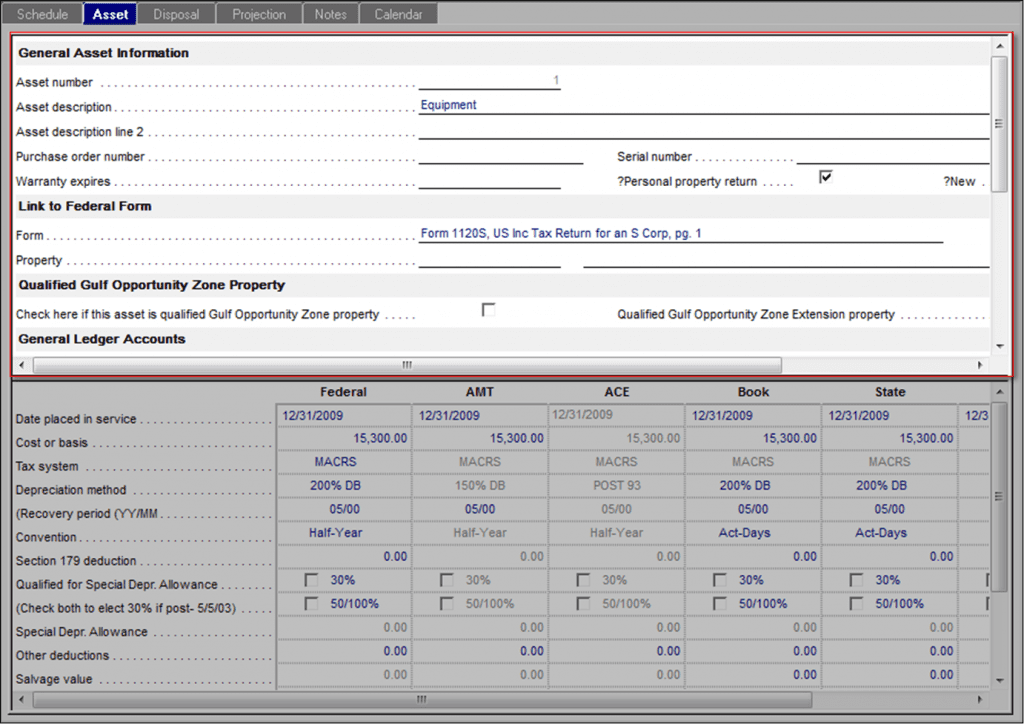
- In the bottom half section, you can add description calculation information like depreciation method, special depreciation allowances, prior or current depreciation, etc.
STEP 5: Asset Synchronization
Type of Synchronization in FAM
Although QuickBooks Desktop and Fixed Asset Manager (FAM) both are different types of files, still, both of the software can exchange or sync information between each other either by Automatic Sync or Manual Sync. Below, we are going to discuss both options in detail so you can choose which one is best for you.
Automatic Synchronization
- First of all, go to the FAM QuickBooks menu and then select the Asset Synchronization option.
- After that, go the From QuickBooks tab and then checkmark the box stating “Automatically when QuickBooks Fixed Asset Manager opens and Both new and modified fixed asset items”.
- Finally, click on OK and then close the Fixed Asset Manager program.
Manual Synchronization
- First of all, go to the FAM QuickBooks menu and then select the Asset Synchronization option.
- After that, go the From QuickBooks tab and then checkmark the box stating Manually by selecting “Update Asset from QuickBooks” from the QuickBooks menu.
- Select OK and then refresh the Fixed Asset Manager program and after that, you can manually sync the data.
- Then, restart the Fixed Asset Manager (FAM).
- Again, go to the FAM QuickBooks, and then you need to either choose the Update Asset from QuickBooks option or Save Assets to QuickBooks option to sync data.
Asset Synchronization: Sample Scenarios
- Usually, when keying in a check, the small business owner enters an asset as a Fixed Asset List item. The small business owners send the company backup file to their Accountant’s and then they open the FAM program. Once the assets are completely imported into the FAM, the accountant will be able to add depreciation and that too without re-entering all of the asset details.
- If the small business owners are not willing to use the Fixed Assets List item, then the accountant needs to manually enter the assets in the FAM program and after that export these assets to the list. After that, the business owner can have their own e-copy of their fixed assets.
- What if the small business owners enter an asset in the Fixed Assets item list? Once the accountant finished importing the asset information in the FAM program, the accountant will be able to modify it or sync it. All the changes will be able to the small business owner as soon as they are made.
What is the role of each program in entering and tracking the assets?
QuickBooks Fixed Account Manager
- Here, you can enter the assets information.
- You can calculate the depreciation cost as per the standard issued by the Internal Revenue Service (IRS).
- You can initiate the General Journal Entries procedure.
- You can easily generate/create different types of Depreciation Reports/Forms.
QuickBooks Desktop
- You enter the assets information here as well.
- As per your requirements, you will be able to generate customized reports from here.
What type of information flow between the QuickBooks and FAM?
If you are wondering then let us tell you about the information that transfers between both software.
From QuickBooks Desktop to the Fixed Asset Manager (FAM)
- Company Information
- Company Name
- Company Contact Details
- Federal Tax ID
- Detailed Asset Information
- Income Tax Form Used
- Chart of Accounts
From the Fixed Asset Manager (FAM) to QuickBooks Desktop
- Asset Number
- Assets that have been added within the Fixed Asset Manager (FAM)
- Year-end Book value
- Detailed Asset information
- Year-end Accumulated Depreciation
The Bottom Line
Now, you can set up a Fixed Account Manager (FAM) without any help from the experts, however, you may want to consult with your accountant before doing that. Because it includes the syncing of the company’s sensitive information, therefore, it is recommended to ask your accountant first.
And you don’t need to worry if face any roadblock while performing these steps, you can call QuickBooks Support without any hesitation. We will make sure that you get an instant solution for any of your problems. Get in touch with us via a 24/7 toll-free customer support number +1-844-405-0904.
