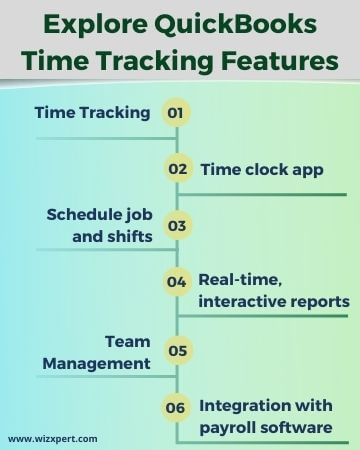
Don’t know how to turn on & use QuickBooks time tracking in QuickBooks Desktop & online? Noting to worry about, in this article we are to cater you the best solutions to resolve this issue. In this article, we will learn in detail how to use QuickBooks Time Tracking software in QB Desktop & Online. Know the process of payroll integration for employees, project mobile setting, etc. Go through the article and learn detailed steps to set up time tracking in QBO & QBD. For any assistance or help contact our QuickBooks Proadvisor toll-free: +1-844-405-0904
QuickBooks plays a very good role in accounting to overcome all your problems. And it can solve all your business-related documents and problems very shortly to consume your time and money. QuickBooks Online is loaded with useful features, each one having many problems we are having advanced tracking systems to solve your all problems.

Table of Contents
How to Turn On and Setup Time Tracking in QuickBooks Desktop
It is very easy to set the time tracking feature in QuickBooks Desktop. Here we will also show how to set up two possibilities for time tracking and optimization.
Steps to Set up time tracking
Follow these steps to set up QuickBooks Desktop for time tracking
- First, you need to sign in as the Admin. Make sure to login with Single-user Mode.
- Later, look for the Edit menu. Then choose Preferences.
- Choose Time & Expenses in the Preferences window and look for the Company Preferences tab.
- For the Do You Track Time? option, choose Yes.
- In the First Day of Work Week drop-down list, choose the day on which you start tracking time each week. (Note: The day you choose affects all weekly time sheets. For example, if you choose Sunday, your time sheets begin with Sunday.)
- On the first day of the workweek drop-down list, select the day on which you begin tracking time every week. (Note: The day you choose changes all weekly time sheets. For example, if you select Sunday, your time sheet rises on Sunday).
- Click on OK.
Steps to set up employees for time tracking
- Navigate to the Employee Center and look for the employee’s name double-click on it.
- Choose the Payroll Info option.
- Select Use Time Data when Creating Paychecks. Then select OK.
Steps to change the day the workweek starts
You can easily change the day the work week begins by following these steps:
- Select Edit, from the top menu bar, Then choose Preferences.
- Choose Time Tracking or Time & Expenses, from the choices on the left menu.
- Later, go to the Company Preferences option.
- choose the drop-down list, next to the first day of the workweek, later select the day your work week starts.
- Click on OK
Steps to change the time
Follow these steps, If you need to change the time format.
- First Go to Edit and then look for Preferences and click on it.
- Choose General from the icons on the left of the screen
- Later, click on Company Preferences.
- Choose Decimal or Minutes. Then click on OK.
- If you need to enter minutes then use a colon within hours and minutes on the entry payroll information screen. The system then uses correctly what was recorded for calculation. (Note: You need to use a colon and not a period among numbers).
What are the benefits of QuickBooks time tracking with QuickBooks?
- Review Employee Timesheets and Approve.
- Capture every billable moment from Browser or Smartphone on any track.
- Recover Lost Revenue, save time and get paid faster to consume money.
- One-click integration with QuickBooks Time Tracking.
Time tracking invoice in QuickBooks

Lots of businesses charge for work by the hour. If that’s you use QuickBooks time tracking which is simplifying invoice in customers for the available time.
- First, you’ve got to track the time you’re working for customers
- Open up a timesheet and choose whose times you’re tracking enter the first customer you did work for if this isn’t a customer you’ve entered into QuickBooks yet.
- Click Save only the customer’s name gets saved you can go to the customer’s page later to enter this customer’s contact info.
- Next, enter the hours you worked on the days you worked them out a new line for each customer you worked for this week.
- When you’re done, save your timesheet.
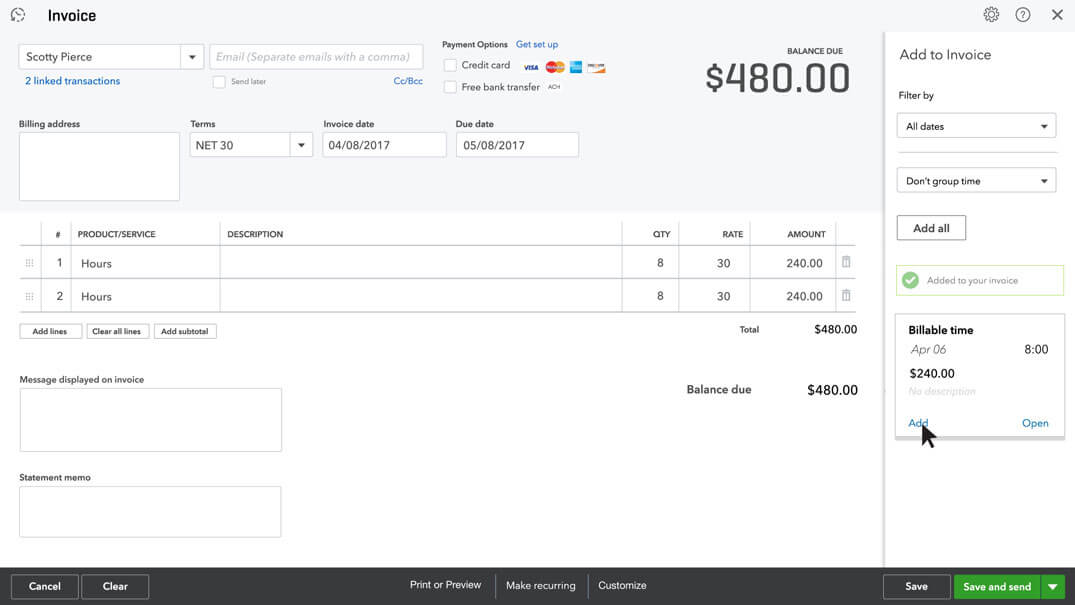
- Here comes the cool part. So now it’s the end of the month and time to invoice your customers when you start the customer’s invoice. There’s your billable time.
- Click Add and put each chunk of billable time into the invoice and that’s it.
- The finish of the invoice send it to your customer and get paid for your work. Now it’s your turn start tracking your billable time so QuickBooks can work for you.

Reports of Time Tracking With QuickBooks.
There are 4 Time tracking reports available:
- Recent/Edited Time Activities
- Time Activities by Customer Detail
- Time Activities by Employee Detail
- Unbilled Time
Points to remember.
- This feature of time tracking is currently not available in QuickBooks online Easy start or Simple start. QuickBooks online plus as well as QB online Essential only have this feature.
- Currently, Time tracking is also not available on mobile devices.
How to Turn On and Setup Time Tracking in QuickBooks Online
With QuickBooks Online Essentials, QuickBooks online plus, and QuickBooks Online Advanced, you easily track and bill customers for your time. Use the time tracking feature to assign a particular activity to a project or customer and choose whether to bill your customers for all activity.
Time Details
Depending on the rates you define and whether the time is billable or not, the time statement will automatically arrive on the customer invoice. The amount of items on the invoice is up to you. You can enter:
- Employee’s name
- Hourly charged rate
- The number of billed hours – It seems as a decimal number on your invoice and like the printed time or emailed version. For illustration, an hour and fifteen minutes will display as 1.25 when an invoice is entered and 1:15 when it is transferred to your customer.
If you want then you can customize the invoice to show the following:
- Text from the summary area on the time sheet
- You can add the name of your standard service which you are using
- Custom text that you define for time tracking entries
Note: Keep in mind, you can only track time on your mobile phone or application if you log in to QuickBooks Online via the browser.
Steps to turn on time tracking
Follow these steps:
- First, navigate to Settings
and choose Account and Settings.
- Click on Advanced.
- Choose Edit
, in the Time tracking section.
- Now it’s time to set your time tracking preferences:
- Click on Save, later select Done.
- Add Service field to timesheets or Make Single- Billable to Time Activity Customer – When one of these boxes is checked, employees and contractors who fill the timesheet can define whether activities should be billed to a customer.
- It is optional to show billing rate to users entering the time
- The first day of work week▼drop-down – This concerns how employees and contractors inspect weekly timesheets.
- Click on Save, later select Done.
Step to add a time tracking user
- Click on Gear Icon on the Toolbar.
- Under Your Company, select Manage Users.
- Select Add user.
- Select Time tracking only.
- Select Next.
- Select which employee or seller you wish to add as a Time Tracking the Only user and enter their contact information.
- Select Save.
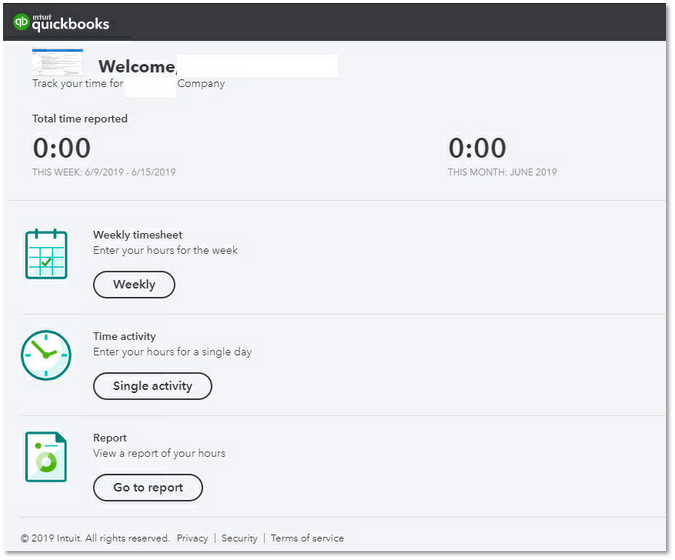
Once you added, the user can able to enter hours in the time sheet

Note: You cannot modify or change the user type for only time-tracking users. If the time tracker requires separate company access, remove the user and re-add them with the new user type.
Steps to make time billable
After setting the time tracking, you can begin identifying the timetable as billable.
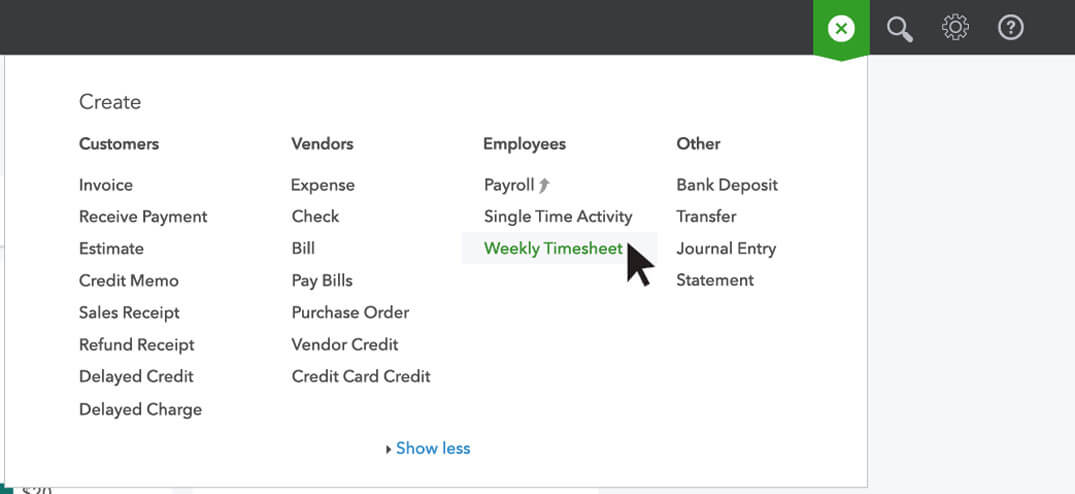
- Choose + New.
- Click on Single Time Activity or Weekly Time sheet.
- Insert all the required details.
- Choose the Billable box.
- Click on Save and Close.
Keep in mind, make time always billable
- Go to Employees and click on it, Observe the employee you want, then click on Edit
.
- Choose the Billable by default checkbox.
- Click on Save.
Steps to access time tracking reports
- First, navigate to Reports.
- In the Report name field, insert any of the following: recent/edited time activities, customer details time activities, employee time activities, and unbold time.
This is one of the most common questions users face while using Intuit payroll service. In today’s article, we have tried to sort out this problem. Follow the steps carefully. If you have any things to discuss with our expert team, you can reach us by dialing our helpline number is +1-844-405-0904 and get instant help from our Intuit certified ProAdvisor.


